
- Subscribe to RSS Feed
- Mark as New
- Mark as Read
- Bookmark
- Subscribe
- Email to a Friend
- Printer Friendly Page
- Report Inappropriate Content
1. Introduction
The XOOM tablet
comes preloaded with a video editing app, called Movie Studio.
Video editing is all about assembling a meaningful final cut
out of smaller clips, put together in the right order, with a
compatible sound track. Video editing is a significant enough task
to be recognized by its own category in the annual Oscar awards.
We
think of video editing as being like carving a sculpture from a block
of stone - you’re removing the dull parts of the medium to reveal the
work of art inside. And, like sculpture, video editing takes time,
effort, and skill to do well. And, also like sculpting, you’ll
occasionally feel like you've struck your thumb with a big hammer.
Expect your first edits to take a little while to come out the way you
want.
This
two part article explains how to get started with the XOOM video
editor, and we include hands-on examples so that you can easily follow
along. Let’s start with some basic facts about the video media
supported by XOOM.
XOOM Video Formats
- the XOOM recording resolution is 720p HD at 30 fps. That’s 1280 wide x 720 pixels high.
- video recording on a XOOM uses the 3gp encoding. 3gp is a mobile device format, adapted from MPEG-4, but optimized for mobile devices to use less bandwidth and storage.
- XOOM can record, play and edit .3gp files. The output from editing is in the .m4v Apple file format (itself also adapted from MPEG-4).
Edited video is rendered into the .m4v format because that format is
more suitable for rewriting a changed audio or video signal.
- XOOM can play, but not record or edit, the Apple .m4v format. So, once you export a movie project from Movie Studio, you cannot do further editing on it. You can continue to work with the original clips, of course.
Let’s look at the basics of editing, and how this is supported in the Movie Studio app.
2. Movie Studio basics
When
you first start Movie Studio, it launches either with no editing
projects under way (inviting you to provide a name for your first
editing project). Or it displays a carousel of editing projects
that are currently in process (inviting you to select one to work
on). Either way, you arrive at a screen similar to figure 1.
Notice there are three bands or strips of controls. From top to
bottom, the three bands are
- Action bar
- Jog wheel, and play control wheel
- Timeline of tracks

Figure 1: the Movie Studio GUI - entire screen
The Action Bar is (as with every Honeycomb app) the thin strip across the very top of the app. The icons on the Action bar change, depending on where you are in the editing process (they are "context-sensitive" in computer terminology). The Action Bar menu entries (top right of the screen) for the empty project supports several actions, shown in figure 2:

Figure 2: the menu items for a new project
These
four menu items let you add a still image or a video clip onto the
timeline. It’s a bit unusual for a video editor to support live
shooting of new images (the function of the first two icons), but the
Activity/Intent structure of Android apps makes this very easy to
support, so the Movie Studio app was endowed with this feature!
Immediately below the Action Bar are the video controls, as displayed in figure 3.
Figure 3: the jog wheel (left) and the play wheel (right)
The
controls for positioning where the video begins playback are on the
right. They include the standard set of buttons for start at
beginning, advance, rewind, play and pause.
The
jog wheel on the left controls the visible size of the assembled video
in your workspace. It allows you to zoom in and out on the video
in the timeline. It is not quite possible to zoom down to the
resolution of individual frames, alas. Figure 4 shows the timeline
portion of the GUI. 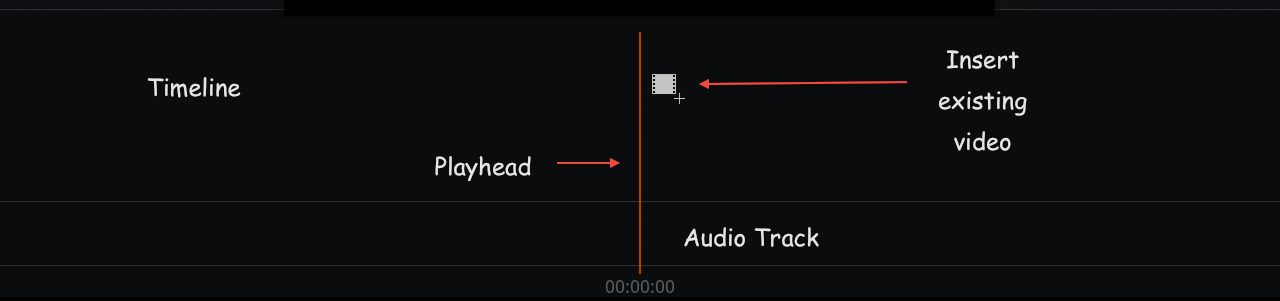
Figure 4: the timeline part of the screen
The
timeline is the area of the screen where you assemble audio and video
clips into your final movie. This is the place to drag clips into
the proper order, and connect them together using scene transition
effects.
The
playhead represents the current position within the video. The playhead
itself doesn’t move; it remains stationary in the center of the lower
part of the screen. To set the playhead to any position within the
video, drag the video left or right in the timeline to the desired
place. You can rotate the jog wheel to see more or fewer of the
clips in your timeline.
As
with other editing software, Movie Studio videos can include audio
tracks. Tap the loudspeaker+ icon (visible in figure 6) to select
the .mp3 file to add to the audio timeline. You may find it
convenient to add the audio track last, after trimming it to the exact
size and fade, using an open source audio editor like the excellent Audacity.
The selected audio track is displayed below the assembled video in the
timeline. The orange ribbon in figure 5 is the waveform of
an audio track (mp3 file) that has been added to the audio timeline. 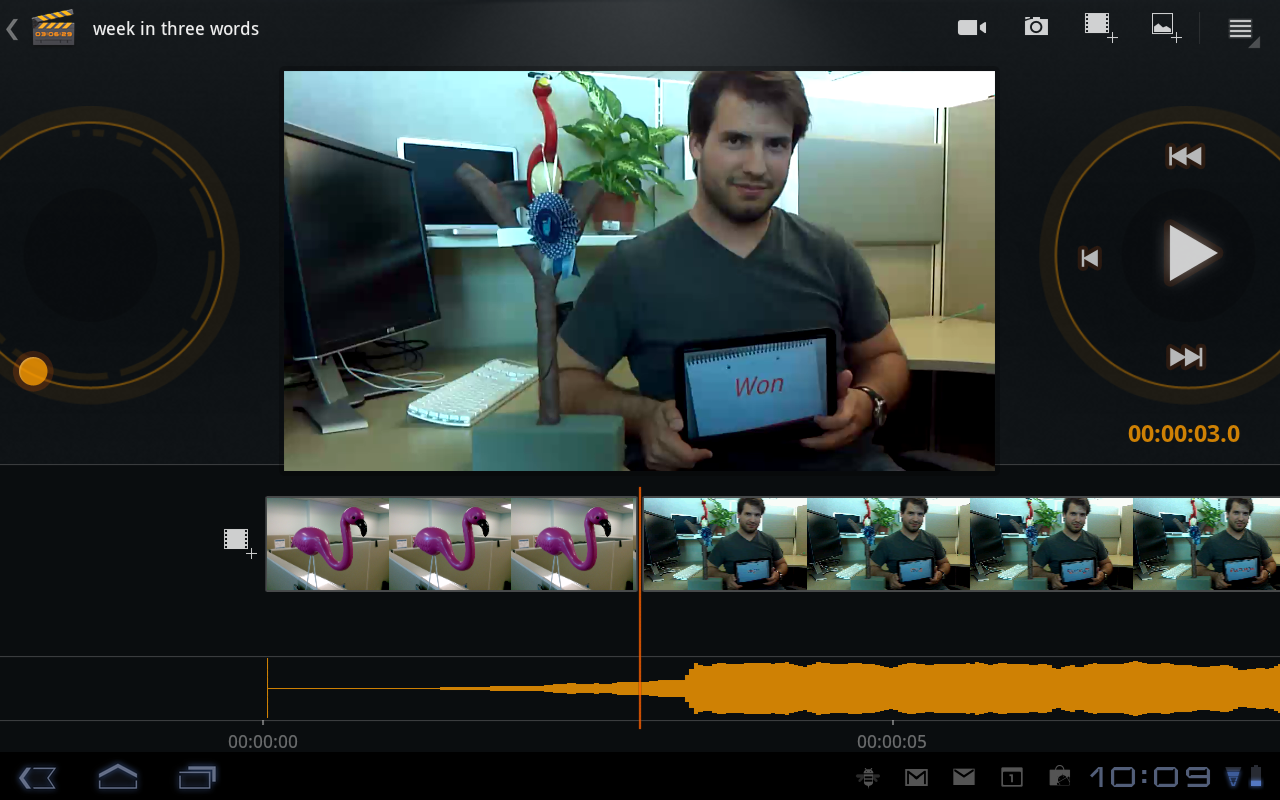
Figure 5: the timeline, displaying two clips and an audio track
3. Clips and Transitions
It’s
time to say more about clips, transitions, and effects. Add
a couple of clips onto your timeline now, if you want to follow along
with this text. For simplicity, we took three pictures of a
computer screen displaying, respectively a pink, green, and blue
color. We added these three still images to the timeline, using
the menu item mentioned earlier.
Once
a clip is in the timeline (remember to spin the jogwheel if you want to
zoom in or out on a clip), you can select it by tapping it. When
you select a photo, it displays a left and right pointing yellow
arrowhead, just past the right end of the image. In figure 6, the
pink image has been selected (it is highlighted with a yellow border),
and the grow/shrink arrows are laying to its right, over the green
image.
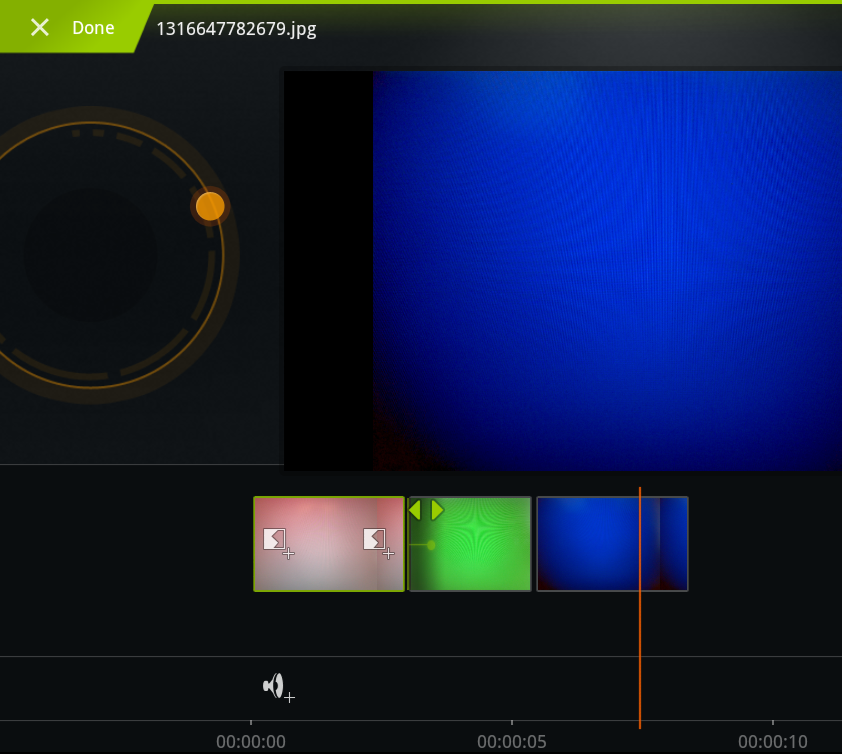
Figure 6: a selected still image displays draggable arrow heads to its right
A little confusingly, the action is not necessarily at the playhead. The playhead just indicates where in the timeline you will start playing, if you hit the play command.
You
can drag a yellow arrowhead to the right or to the left, to make the
image display for a longer or shorter period of time, respectively.
An image is stretched or shrunk by duplicating or removing its
last frames (a still photo is a series of identical frames).
By
contrast, a yellow arrowhead appears at the left and right ends of a
video clip. The yellow arrows can only be used to cut off the
beginning or end of a video clip, respectively. Unlike a still
image, a video clip cannot be dragged to acquire a longer
duration. (Where would the missing movement come from?).
The
jagged “ying/yang” symbols visible on the pink clip in figure 6 and 6A
are used to add a transition effect. (The app designers may have
had a different name in mind for this icon, but did not share it with
the world). A transition effect clearly tells the viewer that you
are switching from one clip to a new clip. Transition effects add a
dramatic emphasis to the change in clip. They can indicate to the
viewer a change in location, pace, mood, or time.

Figure 6A - jagged ying/yang symbol is used to add a transition to clip beginning or end.
Click on the jagged ying/yang symbol at the start or end of a clip, to add a transition effect in that place. Clicking on the symbol brings up a TransitionsActivity (shown in figure 7) that appears to let you choose the transition duration, and the exact effect (e.g. fade in from black). There are 8 different transition effects in all. The default transition duration is 0.5 seconds, and if there is a way to change this in version 1 of Movie Studio, we have not yet uncovered it.

Figure 7: choosing a transition
Be
careful - a transition “steals” frames from the two clips that surround
it. If you have a transition length of 0.5 seconds, the lead-in
clip, and the lead-out clip will each lose 0.25 seconds to the
transition. You should allow for “transition effect loss” before
you truncate your clips.
After
selecting the transition effect, Movie Studio will “render” it - that
is generate the video signal corresponding to the effect.
After an effect has been rendered (which takes several
seconds, during which Movie Studio is busy), you can select the effect
by tapping on it. That creates two new menu items - a crayon and a
trash can. The crayon allows you to choose a different transition
effect (it brings up the TransitionsActivity again, and re-renders your
new choice). The trash can removes the selected transition, and
restores the original lengths of the clips that bracketed the
transition.
Finishing up
When you
have completed editing your clips and transitions, you can export the
movie to its finished .m4v format, by clicking the right most menu item
(4 horizontal bars) and choosing "Export movie"). But be careful -
the exported .m4v file cannot be re-imported into Movie Studio for
further editing!
Stay Tuned for the Next Installment
That’s
enough to get everyone started with basic video editing.
We will post part II of the video editing basics at a
later time. Please enjoy Movie Studio, and post your
comments and observations below.
References
1. http://blogs.indiewire.com/pressplay/archives/IN_T
Anna Schaller and Peter van der Linden
Android Technology Evangelists


