- Subscribe to RSS Feed
- Mark as New
- Mark as Read
- Bookmark
- Subscribe
- Email to a Friend
- Printer Friendly Page
- Report Inappropriate Content
Code to Launch Foam Missiles Over USB!
By Peter van der Linden, Android Technology Evangelist
and
Kris Schaller, Co-Op program member and Computer Science student
What USB devices do developers enjoy the most? There's lots of fun stuff to choose between, with novelty thumb drives, multi-terabyte storage, USB fans and plasma balls. You just know that a lot of software developers are going to put "USB-controlled missile launcher" near the top of their list. And when you need to defend the borders of your cubicle with a missile launcher, you surely want to control it from your XOOM tablet.
This
blog post describes how to connect your XOOM to a USB foam missile
launcher, with enough detail that just about anyone can do it.
First we'll describe the hardware, then the Android app software. 3 ... 2
...1, let's blast off.
Project Hardware
Here is a list of all the hardware you need:
- Motorola XOOM tablet running Android 3.1 (API level 12) or later
- Motorola 89454N cable adapter for XOOM
- USB foam missile launcher
When you've acquired all this hardware, your set-up will look like this picture.

The "missile launcher" from the Hong Kong-based gadget manufacturer, Dream Cheeky.
You can see a picture of the missile launcher on the XOOM screen. That picture (app icon) is part of the dialog you get when you plug this USB device into the XOOM. The Android framework lets you choose an app that will be started automatically on future plug-ins of this USB device, if you wish it.
If you look closely, the missile launcher on the XOOM screen is a robust, olive green, chunky, "take no prisoners" missile launcher. Whereas, the brightly-painted cannon on the desk looks like it was ordered from ACME surplus in a Roadrunner/coyote cartoon.
The
supply chain for USB novelty weaponry isn't everything it could be, and
the circus cannon was all we could lay our hands on at short notice,
OK? The circus cannon is made by the same people who make the
missile launcher (Dream Cheeky in Hong Kong - we presume the phrase
means something significant in Cantonese?) The
circus cannon works with our Android software, but we haven't had a
chance to test an actual missile launcher yet. And if it hasn't
been tested, you should assume it doesn't work.
We're
going to continue calling the hardware a "missile launcher" because who
wants to work on something that looks like it was liberated from a tot's playground by an excitable clown? The "missile launcher" we used was ordered from http://www.amazon.com/Dream-Cheeky-USB-Circus-Cann
Missile Launcher
The Missile Launcher stands about 6 inches tall. It has a circular base, on which is mounted a second ring. The second ring holds the cannon barrel, and can rotate about 340 degrees. The gun barrel can elevate about 45 degrees up from flat.
The missiles are expelled from the gun barrel by compressed air. It takes several seconds to pump up to operating pressure, and the compressor motor is gratifyingly noisy. The swiveling and raise/lower motions are also accompanied by a loud grinding of gears and transmissions. There's been a suggestion that the sound comes from a loudspeaker, not actual mechanical parts. All we can say is this is not a stealth technology. There is a 3 foot long USB cable with a standard type A plug. You need the 89454N cable adapter kit, to connect the launcher to the USB micro type B receptacle on the XOOM.
USB on Android
The launcher comes with a CD containing the software to control it from Windows. We carefully placed the Windows CD to one side, of the wastepaper bin. We planned to take advantage of a new API, and control the missile launcher from an Android app, over a USB connection.
There's a briefing on USB basics in this blog post. Wikipedia also has a good introduction to USB. Google introduced the USB API in API level 12 (Android 3.1 Honeycomb). That gives us the android.hardware.usb package, documented at http://developer.android.com/reference/android/har
The android.hardware.usb package lets you do two things:
- use the standard USB protocol, but only if the android
equipment can act as a USB Host. Luckily, XOOMs implement enough
of the USB "On The Go" protocol to do this, in many cases. The
Missile Launcher app needs hardware with this feature.
That's
a critical point for software developers, so let's say it again with
different words. To control a USB device, an Android computer has to be
capable of acting as a USB host (bus controller). Most Android
handsets do not have this capability, but the XOOM tablet does.
The Missile Launcher app won't run on your Android phone.
- use
the Google-invented extension to the USB protocol (which is known as
the "Open Accessory API") to connect your Android equipment acting as a
USB Device, to some other USB hardware that (with an Arduino kit or
something else) works as a USB Host.
Google
has also created a backward compatability library that supports the
android.hardware.usb package on API level 10 (Android 2.3.3
Gingerbread). This library, com.android.future.usb.accessory, is
not downloadable from the web. It relies on platform-dependent
system library changes, and can therefore only be integrated by hardware
manufacturers.
If you want to work with USB on Gingerbread devices, you must choose a device which ships from the manufacturer with the backward compatability library already installed. If you have the device, you can easily check if it supports the library. Create the "hello world" app, and tuck these lines into the manifest file:
 <application android:label="TestUSBlib" android:icon="@drawable/icon">
     <uses-library android:name="com.android.future.usb.accessory"/>
Then try to run the app. If the library is not on the device, Eclipse will refuse to install it, displaying an error message dialog on your PC, and a log entry on the device.
Be
aware that there are minor but annoying usage differences between the
Google USB add on library and the platform APIs. More details at http://developer.android.com/guide/topics/usb/acce
Project Software
We started out with the intention of programming the Open Accessory API and the Arduino kit, to act as a USB host that controlled both the missile launcher and the XOOM tablet. However, we quickly discovered that was not necessary. Google has already provided a sample Android app to control this missile launcher over USB!
If you have downloaded the code samples for API level 12, you already have the Google "Missile Launcher" app. Here are the complete instructions on how to create the Android app to control the missile launcher from your XOOM:
- create a MOTODEV Studio or Eclipse android project based on <SDK>/samples/android-12/USB/MissileLauncher/ , build the app and install it on your XOOM.
- plug the missile launcher into the cable adapter, and the cable adapter into the XOOM.
- accept the "app launch" dialog that appears when a USB device is plugged in. Then, subdue neighboring cubes with a barrage of missiles.
- Profit!!
Adding a new user interface
The
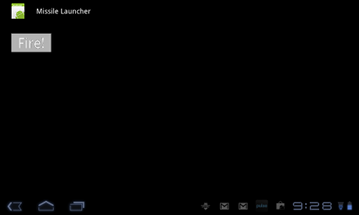
missile launcher in the sample app has a rudimentary interface.
It senses the accelerometer to detect when you tilt the XOOM, and uses
that as an analog for cannon movements. There is a single button
for missile launching. The point of the app is to be an exemplar
for USB, not GUIs.

GUI of <SDK>/samples/android-12/USB/MissileLauncher App
Although
we didn’t need to write any code, we created a new and improved user
interface for Google’s sample app anyway. That's just us. We
control the launcher motion with buttons, instead of the
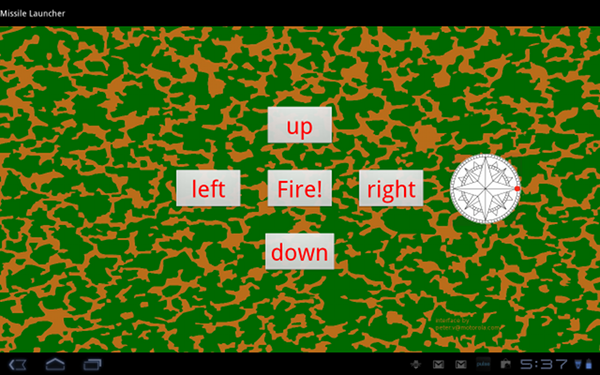
accelerometer. The new interface looks like this

New and improved user interface for the missile launcher
Pressing the "up" button elevates the gun barrel. Pressing it a second time stops the motion. All the other buttons work in the same way. We supply a screen background of a fearsome military camouflage kind, to prove that the missile commander means business. The compass rose is just there for eye candy - to provide some movement in the display.
Buttons
aren't the best component to control the missile launcher
hardware. We're thinking of upgrading the GUI to use a horizontal
slider for left/right bearing (azimuth) and a vertical slider for
up/down elevation (altitude). We'd also like to have two animated
icons that depict barrel motion in real time. That's a project for
another day. (Or another developer - post a message if you're
interested in doing this).
How an App tells the Framework about the USB devices it can control
Some of the work is done in the app manifest, saying “when someone plugs in a USB device, I might be interested.” The AndroidManifest.xml file says that with these lines:
<activity>  ...

<intent-filter>
    <action android:name="android.hardware.usb.action.USB_DEVICE_ATTACHED" />
</intent-filter>

<meta-data android:name="android.hardware.usb.action.USB_DEVICE_ATTACHED"
               android:resource="@xml/device_filter" />

</activity>
The device_filter resource is in file res/xml/device_filter.xml, and it contains these lines
<resources>
    <!-- vendor and product ID for Dream Cheeky USB Missle Launcher -->
    <usb-device vendor-id="2689" product-id="1793" />
    <!-- vendor and product ID for Dream Cheeky Wireless USB Missle Launcher -->
    <usb-device vendor-id="2689" product-id="65281" />
</resources>
That tells us that this app can control two products
from vendor-id 2689, Dream Cheeky. Vendor ids are issued by a
central organization, USB.org. Product ids are assigned by each
manufacturer. The two together uniquely identify any USB device,
and let the framework find the software that knows how to control that
device. That's how an Android app tells the framework that the app
knows how to control USB product-id 1793 and 65281 - two different
models of launcher. If you have a Mac computer, you can
check the vendor id of any USB device by plugging the USB device in,
then clicking Apple > About this Mac > More info >
USB. That tells us, of the two supported devices, this cannon is
product-id 1793.
Advice for App Writers and Artillery persons
So there you have it - the easiest app you'll never have to write - unless you also want a new and improved GUI that will strike fear into the black hearts of your cubicle neighbors.
Peter van der Linden, Android Technology Evangelist
and
Kris Schaller, Co-Op program member and Computer Science student
References
- http://community.developer.motorola.com/t5/MOTODEV
-Blog/The-Open-Accessory-API-and-USB-On-The-Go/ba- ... - http://www.google.com/events/io/2011/sessions/andr
oid-open-accessory-api-and-development-kit-adk.htm ... - http://android-developers.blogspot.com/2011/05/bri
ght-idea-android-open-accessories.html - http://developer.android.com/reference/android/har
dware/usb/package-summary.html - http://developer.android.com/guide/topics/usb/adk.
html


