- Subscribe to RSS Feed
- Mark as New
- Mark as Read
- Bookmark
- Subscribe
- Email to a Friend
- Printer Friendly Page
- Report Inappropriate Content
Friday
is “Bagel and Donut Day” at Motorola Mobility, where management fosters
the Silicon Valley tradition of providing complimentary baked goods in
the breakrooms one day a week. I’d recently read a note from a
mathematician that mentioned you could slice a bagel to form two
interlinked rings. I couldn’t wait to try it, and Bagel Friday was
the perfect opportunity.
Here’s how you turn a single bagel into two linked rings.
1.
Using a small paring knife (put down those machetes and
cutlasses) open up the hole in the middle of the bagel to a decent size.
Observe that, topologically-speaking, you now have not one torus,
but two. Already, the educational magic has started!
Discard the center section that you just cut out. Or take it
to Radcliffe over in the Motoblur team - he eats everything put in
front of him.

2. Spear the bagel vertically, like this.
3.
Extract the knife, and move it to a spot one quarter of the way
around the bagel perimeter. Stab the bagel again, but this
time horizontally, like this:
4.
Again, extract the knife. Now your mission is to
extend the first cut over to the second cut, while slowly rotating the
knife orientation so that the start and end knife positions exactly
match pictures 2 and 3. It is easier to rotate the knife if you
make smooth sawing motions as you rotate, and nearly completely withdraw
the blade on each sawcut. If you’re a klutz like me, you can do
this spiraling cut more easily using a hacksaw or jigsaw blade (for
maximum safety, wear gloves to protect your hands, and don't start the
project until your spouse goes out shopping).
5.
Repeat steps 2 to 4, three more times, each cut following
on from the previous with a 90 degree rotation each time, so that when
you have cut all the way around the bagel, you have also rotated the
knife 360 degrees around the bagel’s thin axis. Put the bagel on
the table, and wiggle it a bit. It will look like this (if
you’re anything like me, you'll go through a few trial-and-errors, and
Radcliffe will be filling up on bagel fragments for the rest of the
week).
6.
Carefully separate the two halves, and observe that you have converted
your bagel into two linked rings. Bask in the appreciative
applause of your breakroom co-workers, and point out that you have more
surface area for cream cheese than their conventionally-sliced bagels.
The picture above shows a Moebius strip
next to the bagel. If you cut a Moebius strip along the
center line (as has been done here), you can open it out into one big
circular ring, or fold it back into a strip. I did the inverse to
the bagel. I took one big ring, and cut a twist into it by
clever knife rotation, to end up with two linked rings. And
there’s no need to stop at two - with a fine blade and enough planning,
you could get 20 linked rings (not me, you). Haven't had enough Moebius entertainment yet? I recommend the excellent "Wind and Mr Ug" video from the mathemusician Vi Hart.
Here’s how you see what's going on with layouts
That’s
how I spent my bagel break this morning. But what I really
intended to tell you about today is a tip for debugging layouts.
Android support for layout design has improved a great deal
recently, with Google’s purchase last year of the Instantiations company
bringing some award-winning GUI Eclipse tools. If you’re still
hand-editing Android xml files, you should update to the latest version
of the Android tools and take another look at the “Graphical Layout” tab
instead of the raw xml tab.
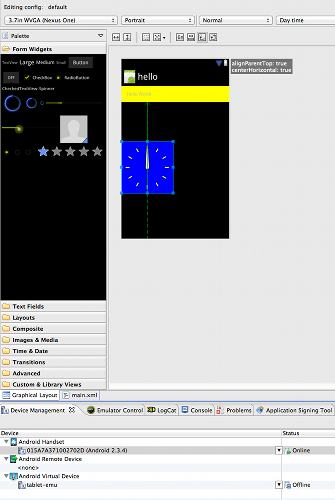
A screen snapshot from MOTODEV Studio ver 3.1.0, using ADT version 16.0.1
You
can now drag and drop Views from the icon trays on the left, onto the
xml palette on the right, and reposition them afterwards. It’s
still not perfect, and some xml hand-editing is still usually needed.
But it’s a good start on a complete visual layout editor, and it’s
getting better with each ADT release.
Here’s
today’s tip. When you have more than one or two nested layouts,
it is sometimes easier to see what’s happening if you can clearly
visualize the boundaries of each layout. Every View, and
therefore every ViewGroup, has an xml attribute called
android:background which is used to set the drawable resource to use for
the View’s background. You can also set the attribute in
Java with
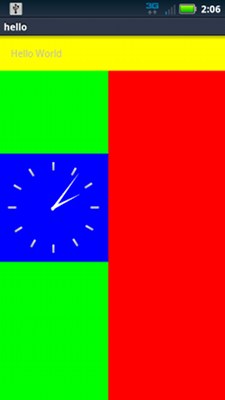
A drawable resource can be as simple as a color, which can be expressed as a 3-byte red-green-blue value, like this:
android:background="#FF0000"
There’s a table of common RGB values-and-colors here. When debugging, you can add that one line attribute to each layout manager, using a different RGB value for each, like this.
<RelativeLayout
android:background="#00FF00"
android:layout_width="wrap_content"
android:layout_height="fill_parent">
You usually give names to colors, and use them like this:
<resources>
<color name="red">#FF0000</color>
<color name="yellow">#FFFF00</color>
<color name="green">#00FF00</color>
</resources>
<RelativeLayout
android:background="@color/green" … >
You typically don’t give the name of a color, but the name of its purpose. E.g.
<color name=data_highlight>#00FF00</color>
Then,
when you need to change the shade, the name remains accurate. But
all that is overkill for a one-liner you’ll remove after debugging.
The first version is easy to add, easy to remove, and it gives
great visual clarity to your nested layouts, as this screen snapshot
shows.
All
that blogging has made me hungry. I think I’ll go to the break
room and see if there are any bagels left. There probably won't be
any - that hound Radcliffe was selfishly tearing into about six of
them, earlier. What are your favorite Android debugging techniques? The MOTODEV team would love to hear your thoughts on the topic.
Peter van der Linden
Android Technology Evangelist


