Easier cycling using electricity - part 2
Peter van der Linden
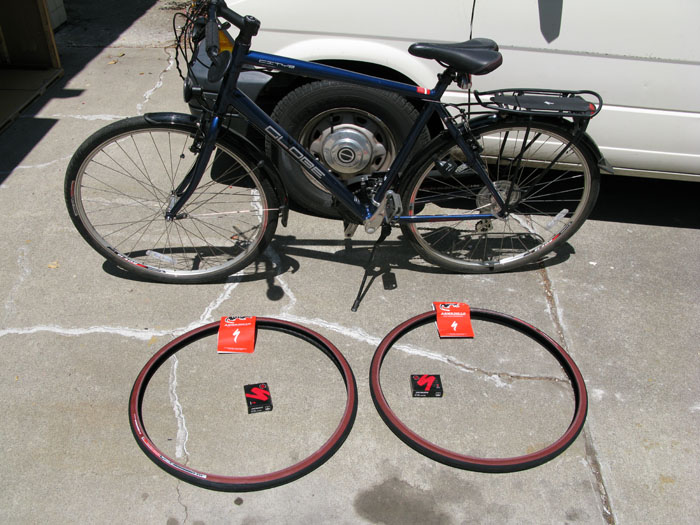
Upgrade your tires and tubes
Tires are the most vulnerable part of any bicycle. If you are commuting to work on a bicycle, you absolutely need puncture protection. You can get this with armored tires, inner tube sealant ("slime"), or a tire lining, or a combination of these. More protection means more weight, but fewer punctures.There are two types of inner tube valves: Presta and Schrader. The wikipedia article is definitive, but here's what it boils down to:
- Presta valves are narrow, allowing a smaller hole in the wheel rim, which makes it stronger (the valve hole is the weakest part of the wheel).
- Schrader valves are an older design, and fatter than Presta. Schrader valves for bicycles have two advantages. First, they are fat enough to allow you to pour tire sealant into the tubes. Second, cars use Schrader valves on their wheels, so you can fill your tires with a gas station air line. But be careful - it's easy to over-inflate and burst your bike inner tube.
I chose the Kevlar protected "All Condition" kevlar-lined Armadillo tires with Presta inner tubes. These are expensive at $50 each, but seem to be worth it. When I do this again, I will use tubes with Schrader valves to allow the use of slime tube sealant. Slime can be added to your tubes before a puncture, or to fix a small puncture after you get one. Either way, you are carrying the weight around with you, so you might as well keep it in the tubes.
Here's my bike right before I got to work.
Here are all the components I am going to add, except the motor.
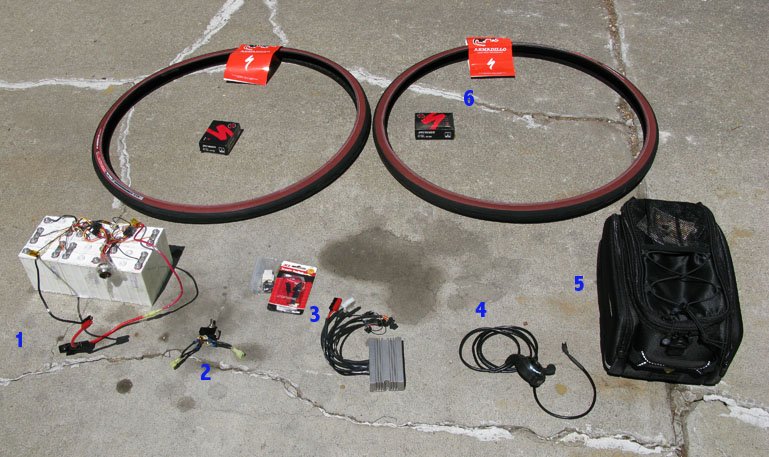
- Battery pack, 37 Volt, 10 amp-hour, lithium-ion.
- On/off switch
- Controller and assorted connectors
- hand-operated throttle
- Saddlebag (to hold and hide the battery pack)
- Kevlar tires and inner tubes to fit.
Mount the tire on the motor wheel
The motor is already mounted in a wheel and the wheel has a rim tape when you get it. This shows my old back wheel on the left, and the new powered back wheel on the right. The motor is inside that fat hub, with the power lead coming out through the spindle on the other side of the wheel.The set of sprockets is called a "freewheel cassette cluster", and I had to supply that (the motor suppliers don't know what kind of gears you are using). Modern clusters fit on splines on the hub spindle, and slip on and off quite easily. Older designs were threaded, and sometimes hard to remove - see Sheldon Brown's excellent bike website for more details.
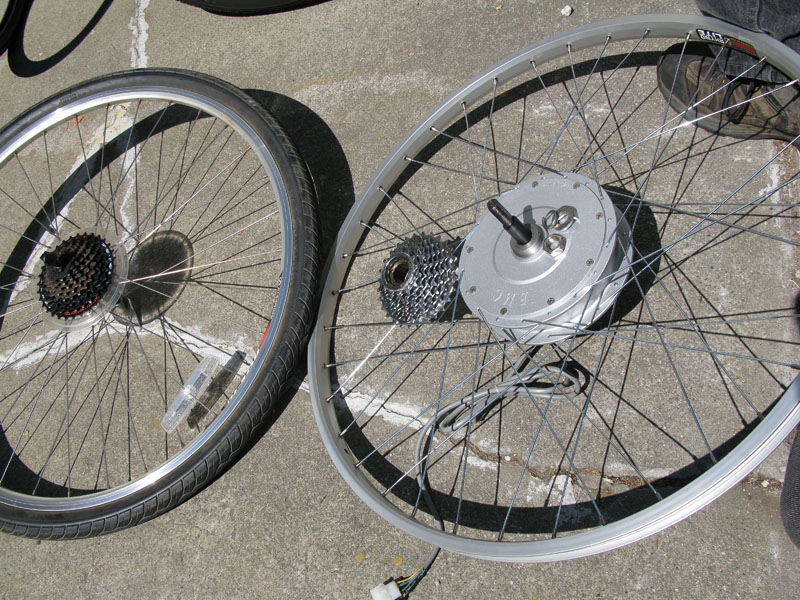
The cassette gears don't affect the motor, which has its own internal gearing. The cassette gears are purely for the human pedalling.
Now put the tube and tire on the rear wheel containing the hub motor. There's quite an art to mounting a bike tire correctly. Here's how it goes.
- Since we're going to remove the back wheel, turn the bike upside down, and stand it
on its handlebars. Rear wheels are always removed with the bike inverted.
Note the rags under the bike to prevent scratches.
- run your thumb all the way round the rimtape, and all the way around the inside of the tire, making sure there is no grit or dirt present.
- put one wall of the tire completely on the wheel.
Leave the other wall completely off
the wheel.
If there is an "arrow" pattern on the tread, the
arrow should be pointing in the direction of rotation.
Slide the tire around until the pressure recommendation words (on the tire wall) line up with the valve hole. (Later, this tells you later how the tire and tube were aligned to each other, so if you find a puncture in one, you can look in the right place for damage in the other).
- put a few pumps of air into the inner tube. Just enough to make it take shape.
- put the inner tube in the tire, with the valve where it should be for the valve hole
in the rim.
Press the valve back into the tire with your fingers. Press the tire across the wheel, and wiggle the valve stem into the hole. When the valve comes through, make sure it is aligned correctly, and with your thumb press it almost all the way back. You are trying to lift the tube up into the top of the tire, so it won't be pinched when the other tire wall is rolled onto the rim. - Feed the other wall of the tire into the rim by the valve. Now work your way around the tire, checking the inner tube positioning, and easing the tire wall over the rim. The last bit is very tough and takes brute strength. Invest $3 in a set of tire levers, and don't try to use a screwdriver.
- The last step is to check the bead of the tire all the way around on both sides. Is it sitting evenly at every point? If not, start again. If so, inflate the tire to full pressure (80-100 lbs/sq inch for this set), and you're done!

Follow the same process to mount the kevlar tire and tube on the front wheel. If you have an odometer on the bike, the magnet on the spoke should be on the same side as the odometer pickup. This tells you the left and right sides of the front wheel. The cassette cluster (sprockets) tells you left and right on the rear wheel.
Fit the motor wheel on the bike
Now you mount the motor wheel back in the frame. Push against the spring loaded gear selector arm, to put some slack in the chain. Be careful with this - the selector arm is the most fragile part on a bike. This is the point where you find out you should have moved the chain onto the smallest gearwheel before you started.Move the wheel so that the chain feeds onto a sprocket on the cassette cluster. Now jiggle the wheel so that the spindle moves easily into the dropouts (the notches in the frame that hold the spindle). Be patient and don't force anything.
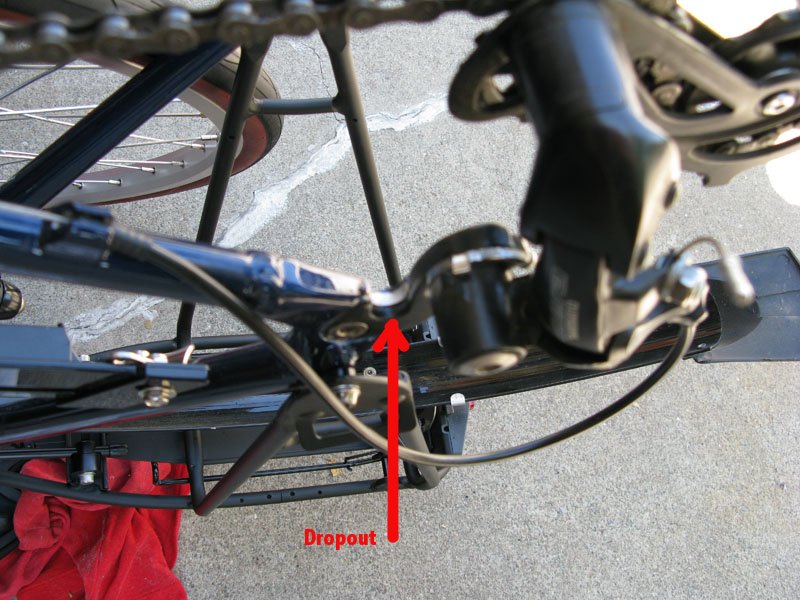
The dropout is a notch in the frame that holds the wheel spindle
You must make certain you get the washers in the right order on the spindle, and on the correct side of the dropouts. This picture shows them correctly aligned, with the tab washer on the wheel side of the dropout, and the tab facing into the dropout.
Make sure the washers are in the correct order on the spindle.
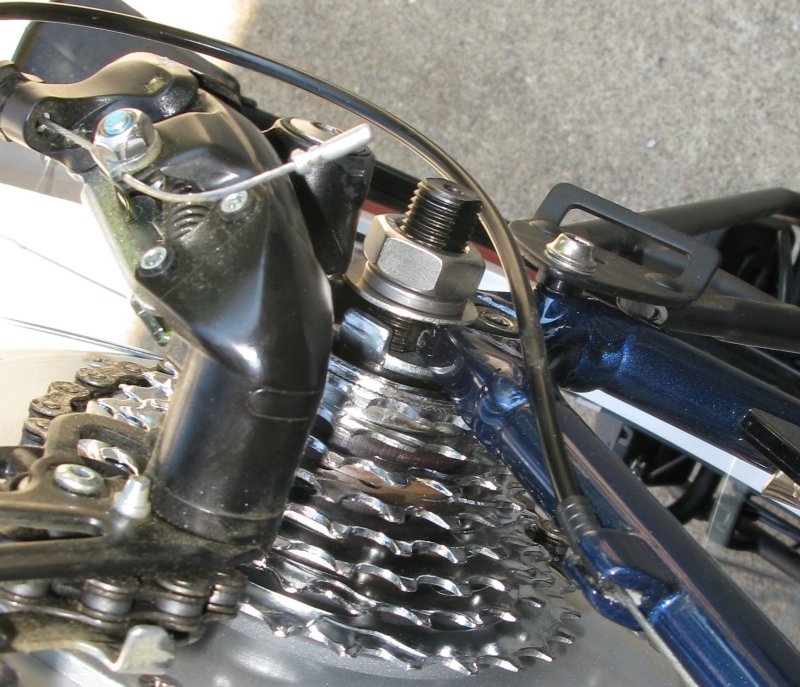
There was an unpleasant surprise here. I saw that the spindle did not go all the way to the bottom of the dropouts. I mildly relieved the dropouts with a file, removed all the filings, and then tapped the wheel home with a rubber mallet. Even so, the arc on the hub spindle had a different curvature to the dropout, and the spindle did not mate to it exactly. I judged that the difference would have no practical effect.
I tightened everything up and checked that the wheel was running true and evenly. You do this by spinning the wheel, and looking at how the rim moves near the bottom bracket (where the front chainwheel is mounted).